0

Welcome to the Journey

Hi, I’m Paige. This is all about me, my house, my family, my life.

I’m just starting, just learning, so bear with me as I work out what works…and what just doesn’t! Any helpful, and friendly, suggestions are welcome and I’ll do what I can to accommodate them!

I’ve never properly blogged before, and who knows, I may be absolutely terrible at it. But we’ll see where it goes!

My guess is that it will soon be filled with recipes, as I love to cook! Most of them will probably be from other sites/sources, but I will always link back to them so they get the credit, and you know where to look for the original.
I also quite like a little DIY and home projects, so I may post a few of those on here as we go along.  Although if you’re looking for “Shabby Chic” you will find no traces of that here!!! And DEFINITELY no bunting!

Have a look around (it won’t take you very long at the moment, there isn’t much to see), and check back, I promise to keep updating and keeping it new.

If you like what you see, why not share it around. The more followers the better!

0

Sugar Free

So I have set another 2 week challenge! Sugar Free for 2 weeks! By sugar-free, I am defining that as processed sugars. So natural occurring sugars such as in fruit, honey or maple syrup are okay.  The hard bit about this is that sugar is in EVERYTHING! Just read a couple food labels and you’ll see what I mean! Often it’s mixed right in there with the daily staples, like bread, cereal, yoghurt, candy (ok, so that one maybe shouldn’t be daily).

So for 2 weeks I’ll be scrutinizing food labels, and making from scratch if need be! Usually the first week just sucks as the body goes into craving overdrive for some cookies, and cakes and sweets oh my. But after that, it starts to realize “hey, I don’t need that stuff. Wow look at all this energy I’ve got.” And that’s exactly what I’ll need leading up to Kids Camp!

Kids Camp is an awesome 4 days away with about 40 kids – but you can’t really over-estimate just how exhausting it is! So, the more energy I have, and the more my body is functioning healthily, the better!

So 2 weeks…here we go! And yummy suggestions of sugar free food (either to buy or make) are more than welcome! Just post a comment below with your thoughts!

1

Getting Crafty

Well I know it’s been awhile since I’ve posted anything here – but now that I’ve started posting on facebook, best make sure this is at least marginally updated!

So I was thinking the other, as I think many people do, “wouldn’t it be nice to have a bit of extra cash.” But I didn’t really know how to make that happen. I have a job, I’m out a lot of evenings with work or work related things.  I don’t really want to get back into wedding photography – at least not full time – as I like having weekends with my man. Then I was just browsing Pinterest, as you do, and saw a picture of a painted pallet sign and thought “I could do that.” And thanks to having a husband who works in the timber industry, we had a few scrap pieces in the shed from other projects. I did a quick search on how to make these signs, got what I needed…and made a sign!

Sign Family

And it turned out great! I was so impressed with a few time go! So I found some more wood, and got a bit creative.

Signs 1

I’ve now made these 4, and just (almost) finished another 5 today. And get this – I like doing it! So, if all goes well, I could make a few extra pounds/bucks/cash by doing something I enjoy! I’ve already sold one, been asked to make at least one more – so let’s see where this goes!

If you are interested, check on my facebook photos for ones that I have available and am selling (if you’re in the UK anyway).  Or if you want one made – send me a message and I’ll see what I can do for you!

Now off to scrub this paint out from under my nails!

0

Summer Challenge

In case you hadn’t noticed…summer is almost upon us! Which means it’s almost time for shorts and t-shirts and possibly swim suits!

In just over 4 weeks time James and I will be flying cross the Atlantic and back to my home in Southern Ontario.  I know Canada is stereotypically known for being covered in 8 feet of snow all year round (which is actually closer to the truth this year apparently), however we also get some incredibly hot summers! And not just the nice dry heat where you don’t really realize you’re all that hot, but humidity which makes it feel like you’re swimming in the air!

That said I’m hoping to spend a good few days at a beach or in a pool! So it’s time to shape up! Now please don’t read this as  me having a “fat day” and just complaining and wanting sympathy from friends and readers.  I have full understanding that I’m not fat, and I’m not looking for “oh you don’t need to do anything” (but not mean “fatty” posts either! hehe). What I am looking to do is just take these 4 weeks to eat healthily, and do some exercise so that by the end of it I’m feeling healthy and perhaps a little more toned up!

I also find it much easier to consistently post on here when I’m in the midst of a challenge! So what I’ll try to do it post any exercise routines, and specifically healthy meals.  Note – I don’t really like exercising, so it’s not going to be “Insanity” style routines. On the other hand, I know that there isn’t such a thing as a quick fix.

So, let the 4 weeks of fitness begin!

1

Oatmeal Chocolate Chip Cookies

Oatmeal Chocolate Chip Cookies

Oatmeal Chocolate Chip Cookies

So I have a confession – I suck at making cookies!! I have had some curse over my life when it comes to making cookies! Whenever I make them, they come out flat flat flat flat – like see-through-the-cookie-onto-the-pan type of flat! I’ve heard all the “solutions”; “use more butter,” “use less butter,” “use more flour,” “use different sugar,” “chill it” and so on! Believe me, I’ve tried! I even experimented with some friends where 3 of us made the dough, 3 of use made the cookie balls and divided them among 2 pans, I put one pan in the oven and my friend put the other in the over…her’s came out perfect Betty Crocker cookies…mine – FLAT!

So, I tend to just avoid the baking step now! Cookie dough is delicious anyway!  And I figure one day when I have kids, they will think I’m the best mom ever because I give them cookie dough instead of cookies!

Well I gave it another go tonight, I was craving some oatmeal chocolate chip cookies. I looked on Pinterest (as you do!), and found a recipe from Mel’s Kitchen Cafe. And you aren’t going to believe this…BUT MY COOKIES LOOK NORMAL!! It is literally a miracle!

I am so excited! So I am going to share this recipe with everyone and use it over and over and over again! Apparently, this is the miracle recipe! So here you go, enjoy some delicious cookies!

Oatmeal Chocolate Chip Cookies

Ingredients
-1 cup of butter, softened to room temperature
-1 cup packed light brown sugar
-1 cup granulated sugar
-2 large eggs
-1 tsp vanilla
-1 tsp baking soda
-1 tsp baking powder
-1 tsp salt
-2 cups all purpose flour (plain flour)
-2 1/2 cups old fashioned rolled oats (porridge oats do the trick)
-2 cups chocolate chips

Directions
1. Preheat oven to 350F. Cream the butter and sugars together
2. Add eggs and vanilla. Beat everything together until it’s light and fluffy
3. Add in the baking powder, baking soda and salt. Mix
4. Add the flour and oats. Mix together.
5. Mix in the chocolate chips,
6. Drop balls of dough (approx 2 Tbsp of dough) onto a greased baking tray. Bake for 10-12 minutes (depending on your oven and desired “done-ness”)
7. Let cool slightly on tray so they don’t fall apart, then move to a cooling rack to finish cooling.

0

Banana Cake with Cream Cheese Frosting

Here is the awaited post!

Banana Cake with Cream Cheese Frosting

Banana Cake with Cream Cheese Frosting

Yummy and Delicious Banana Cake topped with an even yummier Cream Cheese Frosting! If you haven’t picked up on it by now…I LOVE cream cheese frosting!!

The Recipe was very simple. I made the two round cakes one day, then frosted them the next day when I intended to use/eat them.  It didn’t take very long and made a delicious dessert. I will definitely pull this one out again! If you’re interested, you can find the original recipe here.

Banana Cake with Cream Cheese Frosting

Ingredients
-3 cups all-purpose flour
-2 cups sugar
-1 tsp baking soda
-1 tsp ground cinnamon
-1/2 tsp salt
-3 eggs, beaten
-3/4 cup vegetable oil
-4 large ripe bananas, mashed
-1 cup pecans, chopped
-1 1/2 tsp vanilla extract
-1 package (8 oz) cream cheese, room temp
-1/2 cup (1 stick) butter, room temp
-1 lb powdered sugar
-1 tsp vanilla extract

Directions
Cake
1. Grease 2 round cake pans and set aside. Preheat oven to 350F or 175C
2. Mix together flour, sugar, baking soda, cinnamon and salt. Then add the beaten eggs and oil. Stire until the dry ingredients are just moistened – don’t go crazy here, less is more.  Stir in the banana, and pecans and 1 1/2 tsp of vanilla.
3. Divide up the batter between the two pans and back for approximately 25 minutes – until a toothpick or knife comes out clean.
4. Cool the cake layers in their pans for 10 minutes, then turn them out on the rack to cool completely. While the cakes are cooling, make the frosting.
Frosting
1.  Blend together the cream cheese and butter. Gradually add in the powdered sugar and beat until it’s all light and fluffy. Beat in 1 tsp of vanilla.
2. Put a layer of frosting on top of one layer of cake, then put the next cake on top. Then frost the top and sides!
3. Top with nothing or anything (more pecans, sprinkles, chocolate, etc)

Notes
-If you don’t have pecans, you can substitute for any other type of nut, or nothing if you prefer.

0

Recipe Promise

Since I started blogging I’ve been trying to make sure I’ve posted at least once a week…this week I have failed you (depending on how to you look at it). It has been a whole 8 days since I last posted – shock, horror! (Although, I did post last week, and I am posting this week…does that count?).

Easter was super busy this year…and I don’t even have kids! But with planning for our Easter Service, and attending rehearsals, and planning for our Easter Egg Hunt, on top of work and family…well I just lost track of time!

That being said, I did get some time in there to do some delicious baking – and thankfully I was smart enough to take a photo of some of it.

So I promise that within the next few days you will see more lovely recipes that you can try at home! 🙂

Hope you all had a lovely Easter Weekend

1

1 Foot Vegetable Garden

3x3 Vegetable Garden

3×3 Vegetable Garden

Well…it’s slightly more than a foot…but the idea is that you grow one vegetable within 1 foot square.
My garden is 3×3 by 1 foot deep. My handsome husband deserves a pat on the back for constructing this little garden!!

So we sealed all the wood up, built it and filled it all up with soil/compost. Then I planted in the seedlings of my growing veggies. Some of the seedlings are a bit young I think, so I’m hoping I haven’t moved them too soon, but some of them were definitely ready for a bigger growing space! I also planted the lettuce and carrots which instructed to sow directly.

Also, the pepper seeds didn’t germinate with the other ones…don’t know why, they were in the exact same conditions, but oh well. So I have attempted to just plant straight pepper seeds. I didn’t read up on this or anything, I just grabbed the seeds from a pepper I was using for dinner and planted them in the soil…so we’ll see what happens there!

So there are 9 vegetables planted in my 3×3 foot garden, and I can’t wait for them to start growing to eat them hopefully in a few months!!

Can’t wait to see how my little Garden Experiment turns out!

0

Cinnamon Rolls

Ever get that craving for a nice fluffy, soft, cinnamon-y, smothered with icing cinnamon roll? Did you just get that craving now?
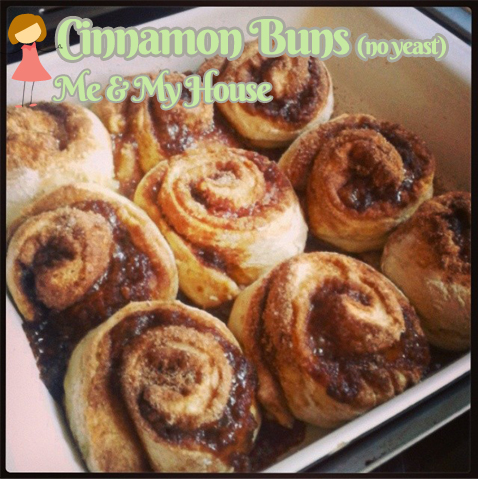
Cinnamon Buns

Cinnamon Buns


Unfortunately, not many people in the UK know the real joys of a proper cinnamon roll! The closest I’ve found is a Chelsea Bun..which is good…but not Cinnamon Bun good!!

Now I’ve looked up a lot of recipes, but most of them had yeast in them, and I couldn’t be bothered to wait for them to rise. I’m sure they’re delicious, but sometimes you just want to eat it NOW, not 4 hours from now!

So I finally just put into pinterest (I do love pinterest!!) “QUICK homemade cinnamon rolls” and voila! Recipes! So I picked this one, tried it and yum yum yum!  The only thing I would change is I would make cream cheese icing – but I didn’t have any cream cheese at home, sad face. But cinnamon buns with cream cheese icing are miles better than regular icing!

So to all my Canadian (or American) followers, here is a lovely quick Cinnamon bun recipe – unless you’ve got the tubed pillsbury ones, those are good too!
To all my British or European followers….here is a Cinnamon Bun recipe you’ve got to try! Awaken your taste buds and show them what is the most delicious breakfast, or snack, or lunch, or whatever, they’ve ever had!!

Cinnamon Rolls

Ingredients
Rolls
-2 1/2 cups of plain/all purpose flour
-3 Tbsp White Sugar
-1 1/4 cups Butter milk (make your own by using regular milk mixed with approx 3 Tbsp white vinegar, and sit for 5 minutes)
-6 Tbsp Melted Butter
-1 1/4 tsp Baking Powder
-1/2 tsp Baking Soda
-1/2 tsp Salt

Filling
-1/2 cup packed brown sugar
-2 tsp cinnamon
-1/8 tsp salt
-1/4 cup White Sugar

Icing
-1 Cup Powdered Sugar
-2 Tbsp Softened Butter
-1 tsp Vanilla
-1 Tbsp Milk (or orange juice)

Directions
1. Preheat oven to 425F and grease a 9 inch square pan

2. In a small bowl, mix together all the Filling ingredients. Then set the bowl aside to use in a few minute.

3. In a larger bowl, mix together (from the Roll Ingredients) flour, sugar, baking powder, baking soda, and salt. Then whisk in the buttermilk and 2 Tbsp of the melted butter. The dough will be very stick at this point…don’t worry!

4. Put some flour down on the counter and place the dough on top. You will need to knead the dough for a minute or two until it becomes smooth. Once this is done, press out the dough into approximately a 9×12 rectangle. Doesn’t haven’t to be EXACT, just close and rectangle-ish shaped.

5. Once it’s laid out, spread about 2 Tbsp of the melted butter on top. You may need to use your hands, or a brush to try to cover the dough as best you can. Then top with the Filling Mix you made earlier. Spread it evening over the dough.

6.  Then start at one end of the dough and tightly roll it up. Once it’s in a log form, cut it into about 8-10 pieces (depending on which way you rolled it). Put these pieces into the prepared dish, and top with remaining 2 Tbsp of butter.

7. Put in oven and bake 20-25 minutes

8. To make the icing, just mix together the Icing Ingredients. Add a TOUCH more water/milk/juice to make it a bit thinner – whatever is your liking.

Notes
-It works to roll either direction, but I think I will try rolling it so that it’s only 9 inches long. This will make less buns, but they will be thicker.
-I didn’t have any cream cheese, but cream cheese icing is always better! Here is a link to a basic cream cheese icing recipe I use sometimes.

0

Vegetable Garden – Seedling

Well it’s been 1 week since I planted my vegetable seeds…and some of them have started to pop through the soil! I’ve got a few pumpkin shoots, Kale, Lettuce and Broccoli so far! Just itty-bitty little baby plants! Now I realized I planted quite a few seeds into these tiny pots…and I’m also not trying to run a farm or anything, so I will have to narrow these down to the healthiest little guys and then go ahead a plant them outside once we build our little garden bed.

Since I’ve never done this before..aside from my own personal “Googling” that I’ll be doing – any first hand tips on how to “thin the crop” without disturbing the other seedlings, or even choosing the right ones would be helpful!!

I’m quite excited about this little project! I really can’t wait to see how it turns out in a few weeks/months time. But seeing the first bit of greenery in the planter pots has made me quite happy!


Little Baby Vegetables!

Little Baby Vegetables!

2

Vegetable Garden

Veggies in Pots

Veggies in Pots

So I think I may have been bitten by the gardening bug….let’s hope my gardening genetics don’t come from my mom though…or I’m about to kill a lot of plants!  I still don’t really like flowers..they’re nice in other people’s gardens…but I can’t be bothered with them, and I’m more for simplicity and practicality!  So veggies it is!

This is two-fold. I think it will be a fun little project, but the plan is that this substitutes buying veggies from other people (stores).  It seems to me a lot easy to walk out to a garden and pick what you need then going to a shop and buying it from who knows where.

So…this will be my attempt at planting a vegetable garden!  My handsome man is going to build me a little enclosed garden area (since we have a concrete courtyard…obviously we need to start with some dirt!).  But most of the seeds I purchased suggest planting indoors first, so I started that today (aside from a couple that say sow directly).

My garden will consist of
-Tomatoes (I hate tomatoes – so does James, but I can use them to make sauces)
-Peppers
-Carrots
-Kale
-Lettuce
-Green Beans
-Broccoli
-Cucumber
-Spinach

And of course the pumpkins I started last week (nothing new on them yet…apparently they are “germinating” according to the package).

I’ve also got a few herbs started that I’d like to grow on the trellises
-Dill
-Parsley
-Coriander
-Chives
-Basil
And I’ll decide on probably about 3 more in the next few days.


Can’t wait!! One day when we have our own place…or at least a place with a decent garden space I would LOVE to have a proper vegetable garden/greenhouse that could actually supply our fruit and veggie needs…but I guess we’ll see how this goes first!

Since I’ve never done this before…anybody who has planted their own veggie garden…your thoughts and input are very welcome! Especially with what plant can/do grow vertical, which ones take over gardens and need space and/or any other helpful tid-bits!

I’ll keep you posted!